This is an example script I wrote for myself to help me learn how to used the imagearc functions. Maybe if will also help others.
<?php
//example PHP script of imagearc functions
$image_width=360;$image_height=360;
$img = imagecreatetruecolor($image_width,$image_height); //make image variable
//create a background color by making a filled rectangle
$color = imagecolorallocate($img,255,255,255);
imagefilledrectangle($img,0,0,$image_width,$image_height,$color);
$r=$image_width/2 - $image_width/32 ; //radius
$cx=$image_width/2;
$cy=$image_height/2;
$color = imagecolorallocate($img,0,0,0);
imagearc($img, $cx, $cy, $r*2, $r*2, 0, 360, $color); //regular outlines arc
imagefilledarc($img, $cx, $cy, $r*1, $r*1, 0, 90, $color,IMG_ARC_CHORD); //filled triangle with chord of circle
imagefilledarc($img, $cx, $cy, $r*1, $r*1, 180, 270, $color,IMG_ARC_PIE); //pie slice
$font_number=5; //can use built in fonts numbered 1 to 5
$string="Hello world!";
imagestring($img, $font_number, $cx-(imagefontwidth($font_number)*strlen($string))/2, $cy-120, $string, $color);
header("Content-type: image/png");
imagepng($img);// output image in the browser
$filename="imagearc";
imagepng($img,"./frames/$filename.png",9); //make highly compressed png
imagedestroy($img);
?>imagearc
(PHP 4, PHP 5, PHP 7, PHP 8)
imagearc — Dessine une ellipse partielle
Description
imagearc(
GdImage
int
int
int
int
int
int
int
): bool
GdImage
$image,int
$center_x,int
$center_y,int
$width,int
$height,int
$start_angle,int
$end_angle,int
$color): bool
imagearc() dessine une ellipse partielle, centrée sur les coordonnées fournies.
Liste de paramètres
imageUn objet GdImage, retournée par une des fonctions de création d'images, comme imagecreatetruecolor().
center_x-
X : coordonnée du centre.
center_y-
Y : coordonnée du centre.
width-
La largeur de l'ellipse.
height-
La hauteur de l'ellipse.
start_angle-
L'angle de début de l'ellipse, en degrés.
end_angle-
L'angle de fin de l'ellipse, en degrés. 0° correspond à la position "trois heures" et l'ellipse est dessiné dans le sens des aiguilles d'une montre.
color-
Un identificateur de couleur créé avec imagecolorallocate().
Historique
| Version | Description |
|---|---|
| 8.0.0 |
image attend une instance de GdImage désormais;
auparavant, une resource gd était attendue.
|
Exemples
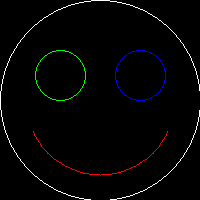
Exemple #1 Dessine d'un cercle avec imagearc()
<?php

// Création d'une image 200*200
$img = imagecreatetruecolor(200, 200);

// Allocation de couleurs
$white = imagecolorallocate($img, 255, 255, 255);
$red   = imagecolorallocate($img, 255,   0,   0);
$green = imagecolorallocate($img,   0, 255,   0);
$blue  = imagecolorallocate($img,   0,   0, 255);

// Dessine la tête
imagearc($img, 100, 100, 200, 200,  0, 360, $white);
// La bouche
imagearc($img, 100, 100, 150, 150, 25, 155, $red);
// les yeux gauche et droit
imagearc($img,  60,  75,  50,  50,  0, 360, $green);
imagearc($img, 140,  75,  50,  50,  0, 360, $blue);

// Affichage au navigateur
header("Content-type: image/png");
imagepng($img);

// Libération de la mémoire
imagedestroy($img);

?>
Résultat de l'exemple ci-dessus est similaire à :
Voir aussi
- imagefilledarc() - Dessine un arc partiel et le remplit
- imageellipse() - Dessine une ellipse
- imagefilledellipse() - Dessine une ellipse pleine
+add a note
User Contributed Notes 20 notes
chandlerklebs at gmail dot com 
12 years ago
eamon at hostelworld dot com 
20 years ago
Right...
possibly the easiest way of drawing a filled circle:
Loop through the imagearc function incrementing the diameter by one pixel:
<?
 // --- code fragment --- //

for($i=1; $i<$Diameter; $i++){
  imagearc($Image, $CenterX, $CenterY, $i, $i, $Start, $End, $Color);
}

// --------------------- //

?>

This works great for circles with diameters up to about 60 or 70 pixels wide. After that, you start to get pixle gaps.
jinny at 263 dot net 
21 years ago
imagesetstyle() sets the style to be used by all line drawing functions when drawing with the special color .

Here goes a example of drawing a dashed-line circle.enjoy!

<?php

header("Content-type: image/jpeg");
$im = imagecreate(100,100);

$b   = imagecolorallocate ($im, 0, 0, 0);
$w   = imagecolorallocate ($im, 255, 255, 255);

$style = array ($b,$b,$b,$b,$b,$w,$w,$w,$w,$w);

imagesetstyle ($im, $style);

imagearc($im,50,50,100,100,0,360,IMG_COLOR_STYLED);

imagejpeg($im);
imagedestroy($im);
?>
lucas dot delmas at live dot fr 
10 years ago
The imagearc function has a precision of one degree. The function truncates the $start and $end values to the inferior degree.

For example if the starting angle you calculated is : -178.62450462172°
and the ending angle is : -152.78056427917°
imagearc will draw a curve from -178° to -152°.

If you need accurate curves drawing, you need to use a loop to draw little step-by-step lines. By creating a large number of short enough lines, you will create the impression of a curve with accuracy.
marc at resiteit dot com 
22 years ago
Round cornered anti-aliased dynamically sized button.


$w=40;

$h=20;

$im = ImageCreate($w,$h);

$white=ImageColorAllocate($im,255,255,255);

ImageFilledRectangle($im,0,0,$w,$h,$white);

imagecolortransparent ($im, $white);

ImageTTFText ($im, $h+ceil($h/3)+1, 0, -1, $h-1, $col1, "arialbd.ttf", "O");

ImageTTFText ($im, $h+ceil($h/3)+1, 0, $w-$h, $h-1, $col1, "arialbd.ttf", "O");

ImageTTFText ($im, $h+ceil($h/3)+1, 0, 1, $h-1, $col1, "arialbd.ttf", "O");

ImageTTFText ($im, $h+ceil($h/3)+1, 0, $w-$h-2, $h-1, $col1, "arialbd.ttf", "O");

$points=array(

    1,round($h/2),

    round($h/4),$h-round($h/4),

    round($h/2),$h,

    $w-(round($h/2)),$h,

    $w-(round($h/4)),$h-round($h/4),

    $w-2,round($h/2),

    $w-round($h/4),round($h/4),

    $w-round($h/2),0,

    round($h/2),0,

    round($h/4),round($h/4)

);

imagefilledpolygon ($im, $points, 10, $col1);


header("content-type: image/gif");

header("Content-Disposition: filename=name.gif");

ImageGif($im);

ImageDestroy($im);
cleverphp 
5 years ago
imagearc example works not well,as it lacks of this line
"$white = imagecolorallocate($img, 255, 255, 255);
    imagefill($img,0,0,$white);
    $black = imagecolorallocate($img, 0, 0, 0);
"
joe dot tym at gmail dot com 
11 years ago
I didn't have much luck with the other two functions, one of them makes circles that look like they've been printed on a dot-matrix printer. This simple function builds a border out of circles, seems to work nicely.


<?php

function imagearcunfilled($image,$x,$y,$width,$height,$border_thickness, $color) {


        imagesetthickness($image, 1);


        $x_radius = $width / 2;

        $y_radius = $height / 2;


        for ($i = 0; $i < 360; $i++) {

                if (TRUE) {

                        $x2 = $x + cos($i) * $x_radius;

                        $y2 = $y + sin($i) * $y_radius;

                        imagefilledarc($image,$x2,$y2,$border_thickness,$border_thickness,0,360,$color,IMG_ARC_PIE);

                }

        }

}

?>
anton dot vandeghinste at telenet dot be 
14 years ago
I needed an arc with a thick border and i didn't like to use 359.9 as end angle so i made a function that works pretty well:

<?php
function imagearcthick($image, $x, $y, $w, $h, $s, $e, $color, $thick = 1)
{
    if($thick == 1)
    {
        return imagearc($image, $x, $y, $w, $h, $s, $e, $color);
    }
    for($i = 1;$i<($thick+1);$i++)
    {
        imagearc($image, $x, $y, $w-($i/5), $h-($i/5),$s,$e,$color);
        imagearc($image, $x, $y, $w+($i/5), $h+($i/5), $s, $e, $color);
    }
}
?>
mojiro at awmn dot net 
18 years ago
A previous for the Rotated (Filled)Ellipse note from(nojer2 at yahoo dot com, 02-Apr-2001 12:06) has a mistake, at the second arc. Replace them with the following listing.

if ($filled) {
    triangle($im, $cx, $cy, $cx+$px, $cy+$py, $cx+$x, $cy+$y, $colour);
    triangle($im, $cx, $cy, $cx-$px, $cy-$py, $cx-$x, $cy-$y, $colour);
} else {
    imageline($im, $cx+$px, $cy+$py, $cx+$x, $cy+$y, $colour);
    imageline($im, $cx-$px, $cy-$py, $cx-$x, $cy-$y, $colour);
}
jerryscript at aol dot com 
20 years ago
[note-Apache/1.3.29 (Win32) PHP/4.3.4]

The imagearc (and imageellipse) functions do not accept line thicknesses when drawn from 0 to 360 degrees.

Drawing from 0 to 359 and again from 359 to 360 does create an ellipse with the current line thickness.

Jerry
Anonymous 
21 years ago
Please note that in order to draw a complete circle or ellipse (without using the imageellipse) you mustn't use 0? for both s and e. If you do this you will get, umm, nothing. Instead set s to 0? and e to 360? to get a complete circle or ellipse.
foripepe at yahoo dot com 
22 years ago
To fill an arc (DiameterX != DiameterY):


<?

function imagefilledarc($Image, $CenterX, $CenterY, $DiameterX, $DiameterY, $Start, $End, $Color) {

    // To draw the arc

    imagearc($Image, $CenterX, $CenterY, $DiameterX, $DiameterY, $Start, $End, $Color);

    // To close the arc with 2 lines between the center and the 2 limits of the arc

    $x = $CenterX + (cos(deg2rad($Start))*($DiameterX/2));

    $y = $CenterY + (sin(deg2rad($Start))*($DiameterY/2));

    imageline($Image, $x, $y, $CenterX, $CenterY, $Color);

    $x = $CenterX + (cos(deg2rad($End))*($DiameterX/2));

    $y = $CenterY + (sin(deg2rad($End))*($DiameterY/2));

    imageline($Image, $x, $y, $CenterX, $CenterY, $Color);

    // To fill the arc, the starting point is a point in the middle of the closed space

    $x = $CenterX + (cos(deg2rad(($Start+$End)/2))*($DiameterX/4));

    $y = $CenterY + (sin(deg2rad(($Start+$End)/2))*($DiameterY/4));

    imagefilltoborder($Image, $x, $y, $Color, $Color);

}

?>


To close the arc with 2 lines (DiameterX != DiameterY):


<?

function imagenofilledarc($Image, $CenterX, $CenterY, $DiameterX, $DiameterY, $Start, $End, $Color) {

    // To draw the arc

    imagearc($Image, $CenterX, $CenterY, $DiameterX, $DiameterY, $Start, $End, $Color);

    // To close the arc with 2 lines between the center and the 2 limits of the arc

    $x = $CenterX + (cos(deg2rad($Start))*($DiameterX/2));

    $y = $CenterY + (sin(deg2rad($Start))*($DiameterY/2));

    imageline($Image, $x, $y, $CenterX, $CenterY, $Color);

    $x = $CenterX + (cos(deg2rad($End))*($DiameterX/2));

    $y = $CenterY + (sin(deg2rad($End))*($DiameterY/2));

    imageline($Image, $x, $y, $CenterX, $CenterY, $Color);

}

?>


An example:

<?

    $destImage = imagecreate( 216, 152 );

    $c0 = imagecolorallocate( $destImage, 0, 255, 255 );

    $c1 = imagecolorallocate( $destImage, 0, 0, 0 );

    $c2 = imagecolorallocate( $destImage, 255, 0, 0 );

    ImageFilledRectangle ( $destImage, 0, 0, 216, 152, $c0 );

    imagefilledarc( $destImage, 108, 76, 180, 80, 0, 130, $c1 );

    imagenofilledarc( $destImage, 108, 76, 180, 80, 0, 130, $c2 );

    header("content-type: image/PNG");

    ImagePNG( $destImage );

    ImageDestroy( $destImage );

?>
nojer2 at yahoo dot com 
23 years ago
Here's a dashed circle function:


<?php

function dashedcircle($im, $cx, $cy, $radius, $colour, $dashsize=5) {


   $dash=false;

   for ($angle=0; $angle<=(180+$dashsize); $angle+=$dashsize) {

      $x = ($radius * cos(deg2rad($angle)));

      $y = ($radius * sin(deg2rad($angle)));


      if ($dash) {

         imageline($im, $cx+$px, $cy+$py, $cx+$x, $cy+$y, $colour);

         imageline($im, $cx-$px, $cx-$py, $cx-$x, $cy-$y, $colour);

      }

      $dash=!$dash;

      $px=$x;

      $py=$y;

   }

}

?>
nojer2 at yahoo dot com 
23 years ago
Here's the function to draw rotated ellipses again. This time I've optimised it a bit, fixed the no-fill bug, and used a 'squishratio' rather than a 'radiusmodifier', to make the curves perfect, so ignore my previous version.


<?php

function rotatedellipse($im, $cx, $cy, $width, $height, $rotateangle, $colour, $filled=true) {

   $step=2;

   $cosangle=cos(deg2rad($rotateangle));

   $sinangle=sin(deg2rad($rotateangle));


   $squishratio = $height/$width;

   $nopreviouspoint = true;

   for ($angle=0; $angle<=(180+$step); $angle+=$step) {


      $ox = ($width * cos(deg2rad($angle)));

      $oy = ($width * sin(deg2rad($angle))) * $squishratio;


      $x =  + (($ox * $cosangle) - ($oy * $sinangle));

      $y = $centrey + (($ox * $sinangle) + ($oy * $cosangle));


      if ($nopreviouspoint) {

        $px=$x;

        $py=$y;

        $nopreviouspoint=false;

      }


      if ($filled) {

         triangle($im, $cx, $cy, $cx+$px, $cy+$py, $cx+$x, $cy+$y, $colour);

         triangle($im, $cx, $cy, $cx-$px, $cx-$py, $cx-$x, $cy-$y, $colour);

      } else {

         imageline($im, $cx+$px, $cy+$py, $cx+$x, $cy+$y, $colour);

         imageline($im, $cx-$px, $cx-$py, $cx-$x, $cy-$y, $colour);

      }

      $px=$x;

      $py=$y;

   }

}


function triangle($im, $x1,$y1, $x2,$y2, $x3,$y3, $colour) {

   $coords = array($x1,$y1, $x2,$y2, $x3,$y3);

   imagefilledpolygon($im, $coords, 3, $colour);

}

?>
timothyhouck at yahoo dot com 
23 years ago
To do filled arcs, try something like this:


<?php

$diameter = 50;

imagearc($image, 25, 25, $diameter, $diameter, $start, $end, $color);

while($diameter > 0) {

  imagearc($image, 25, 25, $diameter, $diameter, $start, $start + 1, $color);

  imagearc($image, 25, 25, $diameter, $diameter, $end - 1, $end, $color);

  $diameter--;

}

?>


...well you get the point.  It's a kludge, and *very* slow, but it's free.
travis at duluth dot com 
24 years ago
The wierd thing is that the first two integers tell where to place the "circle".

So for example I first create the "pallet" to place the circle on.

$image = imagecreate(500, 500);

(this makes a huge 500x500 gif :) )

$colorBody = imagecolorallocate($image, 0, 0, 0);

(make the default color of the "pallet" black

$circleColor = imagecolorallocate($image, 255, 0, 255);

(going to make the circle an ugly pink color)

imagearc($image, 250, 250, 300, 300, 0, 360, $circleColor);

Places the image in the center (250,250) and the circle is 300 pixels in diameter.


Hope this helps.


Travis Kent Beste
ajim1417 at gmail dot com 
14 years ago
I wrote a simple function that can draws an arc counter-clockwisekly. Here it is :

<?php

function imagearcCC(&$im, $cx, $cy, $w, $h, $s, $e, $c) {
$start = 360 - $e;
$end = 360 - $s;
return imagearc($im, $cx, $cy, $w, $h, $start, $end, $c);
}

?>

The params of this function is exactly the same as the usual imagearc function.
logang at deltatee dot com 
20 years ago
Heres a function to make a curve between two points... This will be a downward curve but it wouldn't be hard to make a similar function to make an upward curve. The first point has to be to the left of the second point ($x1 < $x2), and height is actually backwards. The larger height is the less of a crest the curve has. I imagine with a few modifications this functions could make upward curves as well.

function ImageCurveDown ($image, $x1, $y1, $x2, $y2, $height, $color) {
    $presicion = 1;

    for ($left = ($x1-$x2); $left < 0; $left++){
        if ($y1 < $y2) {
            $cy = $y2 + $height;
            $cx = $x1 - $left;
        } else {
            $cy = $y1 + $height;
            $cx = $x2 + $left;
        }
        $nx1 = abs($x1 - $cx);
        $ny1 = abs($y1 - $cy);
        $nx2 = abs($x2 - $cx);
        $ny2 = abs($y2 - $cy);

        if ($y1 < $y2) {
            if ($nx2 == 0 || $ny1 == 0) continue;
            $angle1 = atan($height/$nx2);
            $A1 = $nx2/cos ($angle1);
            $B1 = $ny2/sin ($angle1);
            $angle2 = pi()/2 +atan($left/$ny1);
            $A2 = $nx1/cos ($angle2);
            $B2 = $ny1/sin ($angle2);
        } else {
            if ($ny2 == 0 || $nx1 == 0) continue;
            $angle1 = atan($ny2/$nx2);
            $A1 = abs($nx2/cos ($angle1));
            $B1 = abs($ny2/sin ($angle1));
            $angle2 = atan($height/$nx1);
            $A2 = abs ($nx1/cos ($angle2));
            $B2 = abs($ny1/sin ($angle2));
        }

        if (abs($A1 - $A2) < $presicion && abs ($B1 - $B2) < $presicion) {
            ImageArc($image, $cx, $cy, $A1*2, $B1*2, 180+rad2deg($angle2), 360-rad2deg($angle1), $color);
        }
    }
}
cbriou at orange-art dot fr 
23 years ago
There is another way to fill an arc :


<?php

// To draw the arc

$Color = imagecolorallocate($Image, $Red, $Green, $Blue);

imagearc($Image, $CenterX, $CenterY, $Diameter, $Diameter, $Start, $End, $Color);

// To close the arc with 2 lines between the center and the 2 limits of the arc

$x = $CenterX + (cos(deg2rad($Start))*($Diameter/2));

$y = $CenterY + (sin(deg2rad($Start))*($Diameter/2));

imageline($Image, $x, $y, $CenterX, $CenterY, $Color);

$x = $CenterX + (cos(deg2rad($End))*($Diameter/2));

$y = $CenterY + (sin(deg2rad($End))*($Diameter/2));

imageline($Image, $x, $y, $CenterX, $CenterY, $Color);

// To fill the arc, the starting point is a point in the middle of the closed space

$x = $CenterX + (cos(deg2rad(($Start+$End)/2))*($Diameter/4));

$y = $CenterY + (sin(deg2rad(($Start+$End)/2))*($Diameter/4));

imagefilltoborder($Image, $x, $y, $Color, $Color);

?>
arve at skogvold dot as 
22 years ago
I found a better way for drawing a pie chart:


header ("Content-type: image/png");

$diameter = 100;

$radius = $diameter / 2;

$centerX = $radius;

$centerY = $radius;


$im = @ImageCreate ($diameter, $diameter)

    or die ("Cannot Initialize new GD image stream");


$background = ImageColorAllocate ($im, 0, 0, 0);

$red = ImageColorAllocate ($im, 176, 0, 0);


function fill_arc($start, $end, $color) {

    global $diameter, $centerX, $centerY, $im, $radius;

    imagearc($im, $centerX, $centerY, $diameter, $diameter, $start, $end, $color);

    imageline($im, $centerX, $centerY, $centerX + cos(deg2rad($start)) * $radius, $centerY + sin(deg2rad($start)) * $radius, $color);

    imageline($im, $centerX, $centerY, $centerX + cos(deg2rad($end)) * $radius, $centerY + sin(deg2rad($end)) * $radius, $color);

    imagefill ($im,$centerX + $radius * 0.5 *cos(deg2rad($start+($end-$start)/2)), $centerY + $radius * 0.5 * sin(deg2rad($start+($end-$start)/2)), $color);

    }


fill_arc(0,30,$red);

// Will make a red filled arc, starting at 0 degrees, ending at 30 degrees


ImagePng ($im);